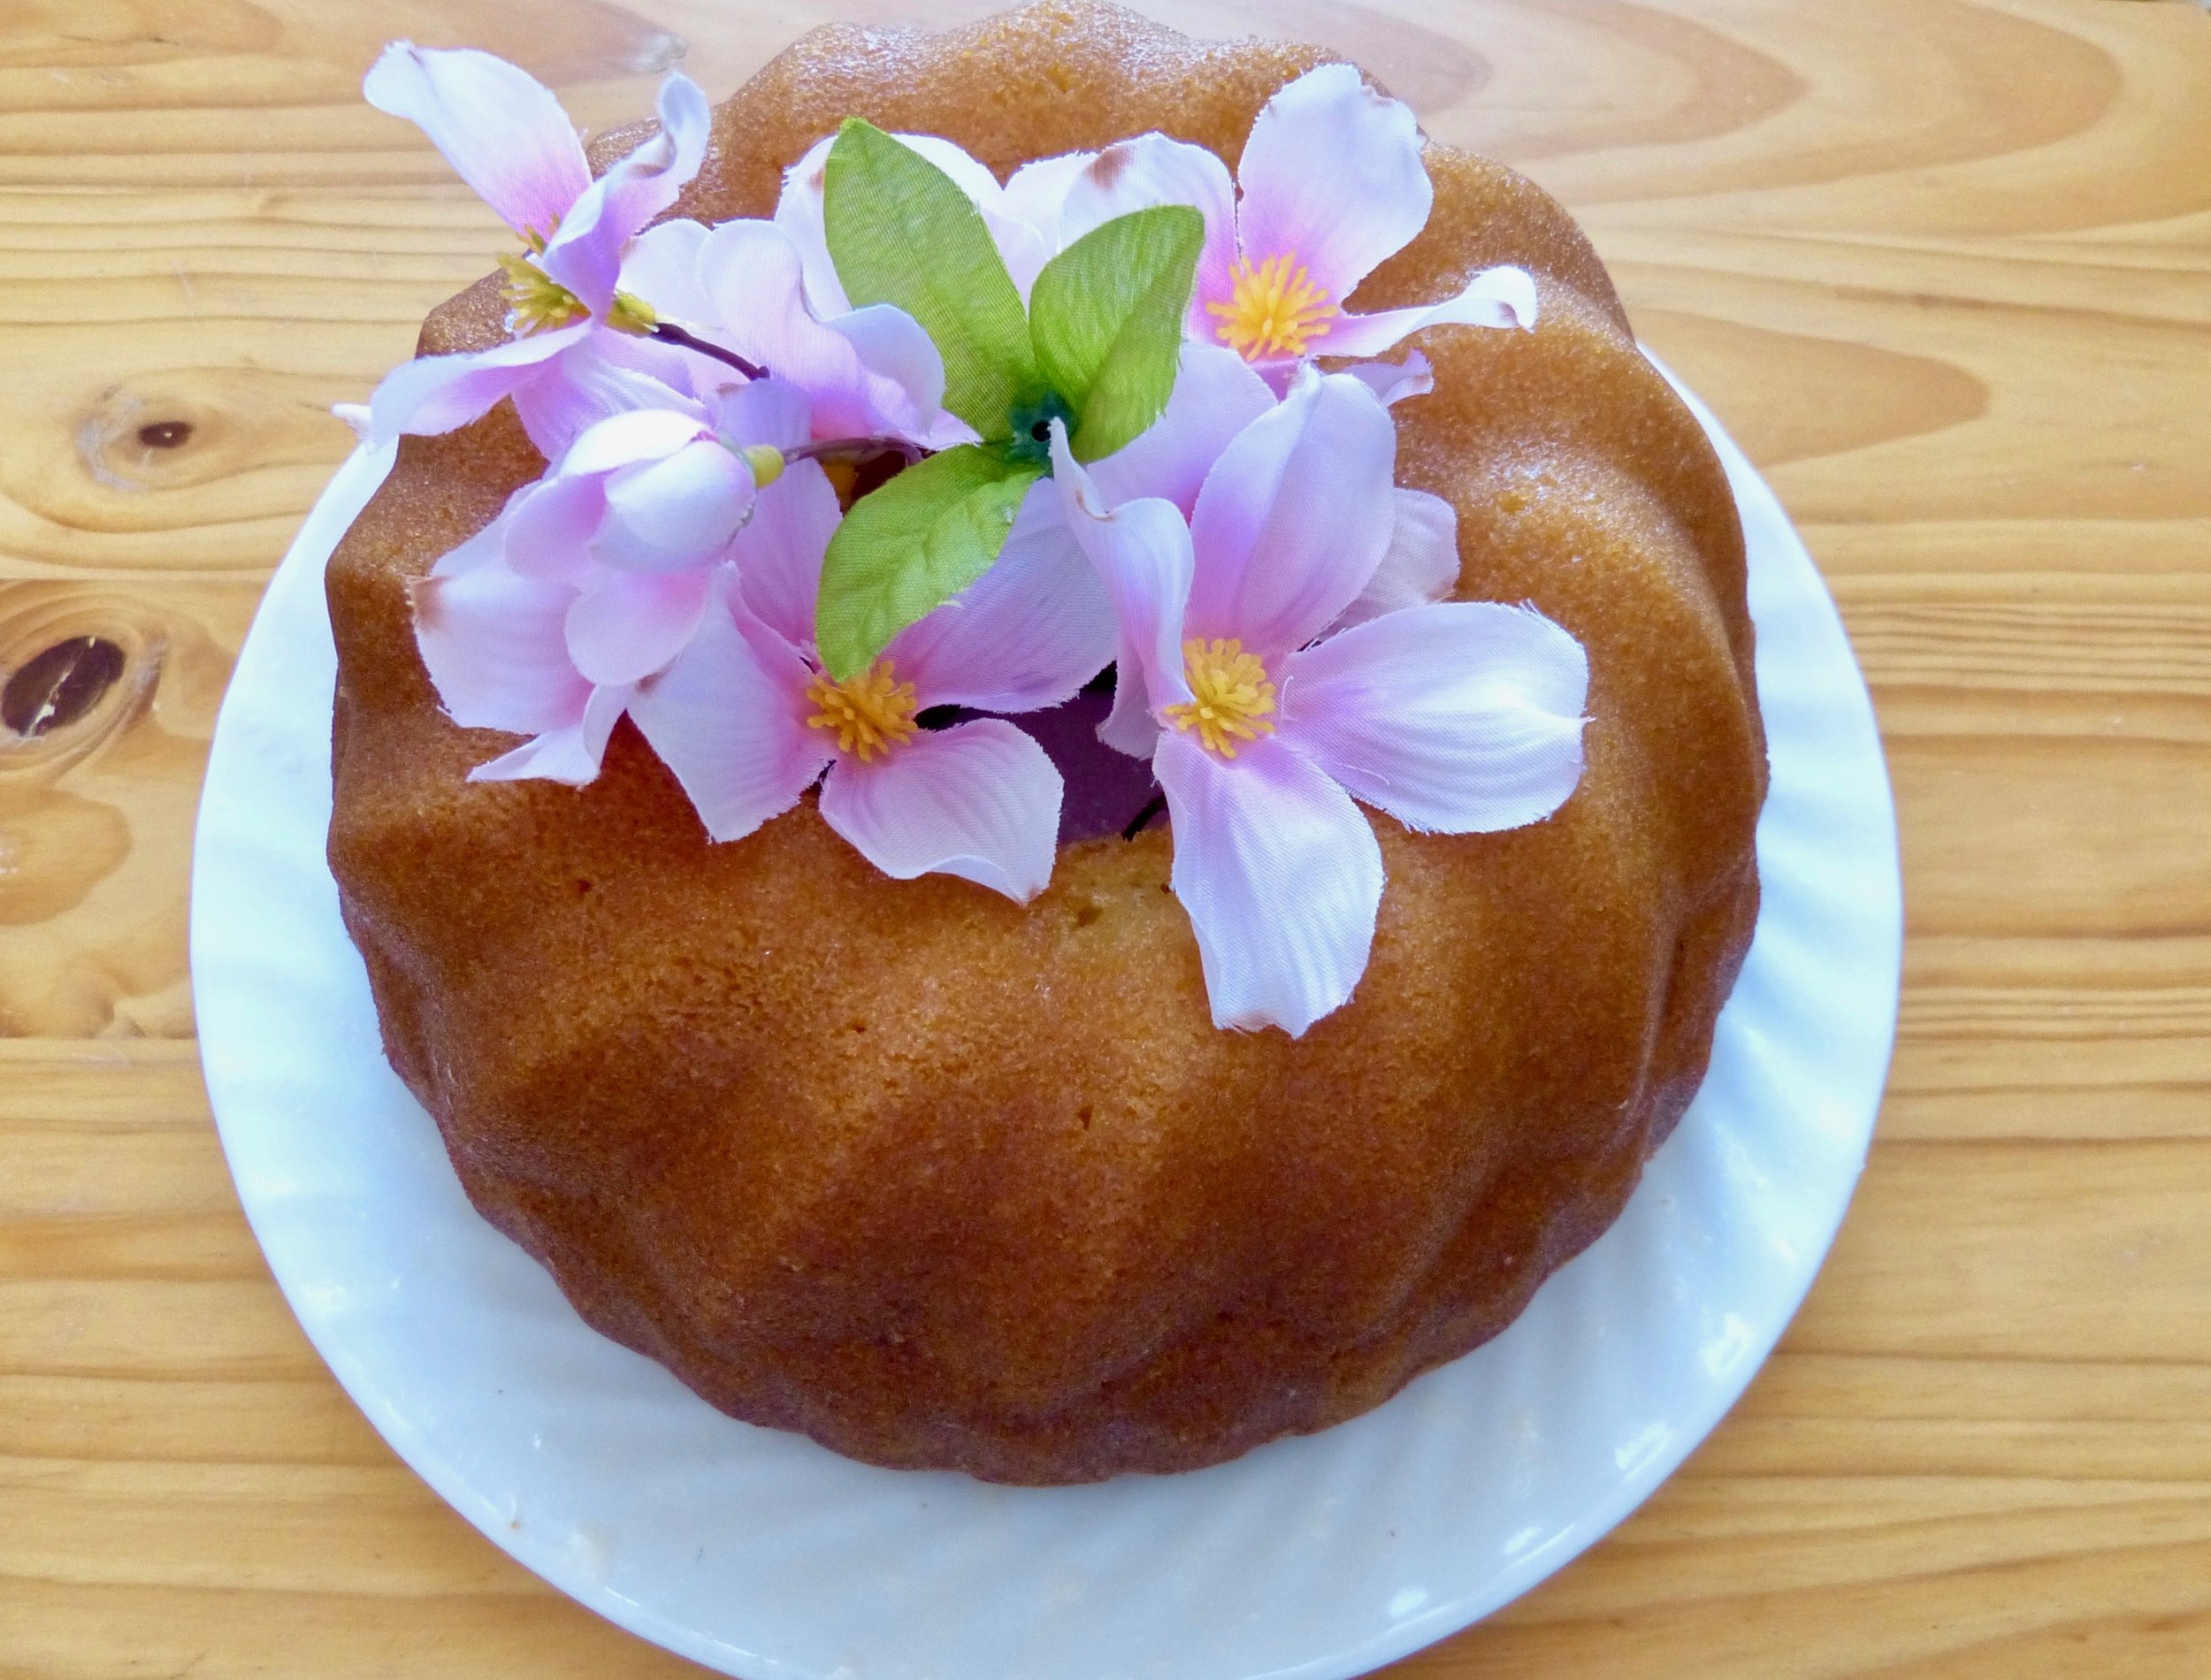
Blog

Baking Powder Biscuits, Step by Step

Beautiful!  Photo by S. Van Slooten

Beautiful!  Photo by S. Van Slooten


I’ve been away for a while, but have a whole new approach to my blogs for you. I have decided to do some recipes with step by step photos. This first one will be an easy one, Baking Powder Biscuits, but the results will be fabulous. Everyone loves a hot biscuit, slathered with butter. My mouth is watering just thinking about this. In this new approach, you will be able to see (almost) each step, starting with the ingredients, the mixing, cutting, and baking. Also, I feel this is a more personal approach, because you will walk with me through the entire process. You will get everything but the heat of the oven and the smell of baking biscuits.  

Let us begin with the equipment and ingredients:

The tools of the trade. Photo by S. Van Slooten

The tools of the trade. Photo by S. Van Slooten

The ingredients. Photo by S. Van Slooten

The ingredients. Photo by S. Van Slooten


Ingredients:

1 1/2 cups unbleached white flour

1/2 cup whole wheat flour

1 tbl. Cornstarch

2 tsp. baking powder

1/2 tsp. salt

1/2 tsp. baking soda

1/4 cup butter, chilled & cubed

1 cup buttermilk

Method:

Preheat oven to 400 degrees. Meanwhile, in a large mixing bowl, place the flours, cornstarch, baking powder and soda, and salt. Stir. Cut in the butter with a pastry blender until there are no large pieces.

Add the buttermilk, stirring with a fork to make a dough.

Preparing to cut in the butter.  Photo by S. Van Slooten

Preparing to cut in the butter.  Photo by S. Van Slooten

It should look like this, some larger pieces are good.  Photo by S. Van Slooten.

It should look like this, some larger pieces are good.  Photo by S. Van Slooten.

 If the dough is too stiff or dry, you may add some more buttermilk. Once dough has come together, turn out on a floured board and knead briefly. Pat dough into a square or round (depending if you want square or round biscuits) about 2 inches thick. Cut into squares about 2 inches square, or use a round cookie cutter or biscuit cutter. I use a pizza cutter for the square ones, goes very quickly and easily.  

All rolled and cut, ready for the baking sheet. Photo by S. Van Slooten

All rolled and cut, ready for the baking sheet. Photo by S. Van Slooten


Place biscuits on a greased or parchment lined baking sheet, about 2 inches apart. Bake until they are golden brown on top, about 15 minutes. Keep an eye on them, you do not want them over baked.  When done, cool on a wire rack, or for immediate consumption, slather with butter, enjoy. Biscuits do not keep well in my opinion and are best eaten fresh, still hot from the oven. For shortcake, do cool them, split, add strawberries and cream, voila, you have dessert. 

Black Magic Cake

Black Magic Cake

Deep, dark, and delicious mean anything? This cake speaks to the inner chocoholic in all of our chocolate hearts.

I have decided that the next few blogs will center around one peculiar ingredient, coupled usually with chocolate. The darker the better. The key ingredient? Leftover coffee. Hold on, now, haven’t we all had pots of leftover coffee, and regret having to throw it out? After all, coffee is expensive these days! And coffee and chocolate go together beautifully. So over the course of the next several weeks, we will look at a cake, fudge sauce (you might want that with the cake, see photo), Tiramisu, and the one savoury entry, a coffee glaze for BBQ and fish. 

The cake in question originally came from an old cookbook of mine, but as usual, has been tweaked here and there. I’ve made this one many, many times, and felt it needed sharing. It’s pretty simple to put together, and bakes in a 9X13 pan, two pluses in my mind. The book in question is an oldie but goodie, and goes by the appropriate name of Choice Chocolate Recipes, put out by Farm Journal in the 70s. I’ve made many of the recipes in this book, but this one remains my favourite. 

Ingredients:

1 ¾ cups all purpose flour

1 tsp. salt

2 cups sugar (Please note, when I make the cake, I only use 1 cup white sugar)

¾ cup baking cocoa

2 tsp. baking soda

1 tsp. baking powder

2 eggs

½ cup vegetable oil

1 cup strong black coffee (*see note)

1 cup buttermilk (**see note)

1 tsp. vanilla

Stir together flour, sugar, cocoa, baking soda, baking powder and salt in mixing bowl. Add eggs, oil, coffee, buttermilk and vanilla. Beat with electric mixer at medium speed 2 min. Pour into greased 13X9” baking pan.

Bake in a 350 oven for 40 minutes or so, until cake tests done. Cool pan on rack. Makes 16 servings. 

Next blog:  How to make the fudge sauce, so stay tuned. 

References:

Manning, Elise W., Editor. “Farm Journal’s Choice Chocolate Recipes.” New York: Doubleday Company, Inc., 1978.


Notes:

1.     If you don’t have leftover coffee, but still want to make the cake, you can use 2 tsp. instant in one cup hot water. Let cool.

2.     If you don’t have buttermilk, you can use a scant 1 cup of milk with 2 tsp white vinegar, cider vinegar will also work. Stir together and let sit for a couple of minutes.

You can follow the further adventures of Sue or sign up for a class at her website: wwwsvanslooten@icloud.com.


Cinnamon Crisps


This is a comfort food cookie for a winter’s night with a glass of cold milk or great cup of tea.


Cinnamon CrispsPhoto by Sue Van Slooten

Cinnamon CrispsPhoto by Sue Van Slooten

Here’s a great cookie for Christmas, or anytime. And depending on your taste, you can make it several ways: With nuts, without nuts, with cinnamon sugar, or with cinnamon sugar and nuts. It’s all how you feel that day (or if anyone has a nut allergy, just go the cinnamon route). If you’re a cinnamon freak like me, I went with the cinnamon sugar option. This is your basic refrigerator, slice and bake cookie, so is easy to make. You can make up the roll of dough ahead of time, and keep it in your fridge until you’re ready to bake. The origin of this cookie came from one of my older cookbooks, Cookies for Christmas, but as is usual with me, nothing ever stays as written. I have to tweak. Hence, the different “coatings.” Full info on the book is below, to give credit where credit is due.

The key ingredient in this cookie is cinnamon, my favourite spice. I use it year round, in lots of things. Most of the cinnamon sold in supermarkets is cassia, not what is called in English, true cinnamon, or cinnamomun verum [1).  Cassia is much cheaper to produce, hence why the supermarkets all carry it and not the other. However, I got a Christmas present of Saigon cinnamon, complete in it’s own little cinnamon wood box. Now that’s a gift to make this baker happy! Another nice feature? It’s from World Vision’s Christmas catalogue, so my gift giver also gave me a beautiful gift reflecting social consciousness. It’s nice to know people know my tastes! Which brings us back to the cookie, as I had to find something to do with that lovely cinnamon. The cinnamon in question has a nice sweet flavor, not a dry taste like so many others have. Perfect for baking. So, you will want to fire up your oven for some great cookies.

Ingredients:

1 ¾ cups all purpose flour

1 tsp. cinnamon

¼ tsp. salt

¾ cup butter or margarine

1/3 cup sugar (Please note, when I made these cookies, I left the white sugar out)

1/3 cup packed brown sugar

1 egg

1 tsp. vanilla

½ cup finely chopped pecans And/Or

¼ cup cinnamon sugar

Stir together flour, cinnamon, and salt. In a large mixer bowl beat butter or margarine till softened. Add sugar (if using) and brown sugar and beat till fluffy. Add egg and vanilla and beat well. Cover and chill about 30 minutes or till easy to handle.

Shape into a 12” roll. Roll in nuts and/or cinnamon sugar to coat. Wrap and chill for at least 2 hours or overnight. Cut into ¼ “ slices. Place on an ungreased cookie sheet. Bake in a 350 oven for 10 to 12 minutes or till done. Remove and cool.  Makes 48 (although I had less).

What I found with the ¼” thick cookie, was that they were more like shortbread. I would suggest maybe 1/8 “ if you want a crispier cookie, but watch your baking time, they will bake much faster. 

References:

Better Homes and Gardens. “Cookies for Christmas.” Des Moines, Iowa: Better Homes and Gardens Books, Meredith Corporation, 1985.

Notes:

1. https://en.wikipedia.org/wiki/Cinnamon Wikipedia does a decent job of explaining cinnamon, and a very detailed history of the spice throughout history. Quite interesting.


Orange Mulled Whiskey Cider


When the winds begin to howl, and Christmas music plays in the background, this is the time of year for a hot (spiked) cider drink.


Orange Mulled Whiskey CiderPhoto by Bob Van Slooten

Orange Mulled Whiskey CiderPhoto by Bob Van Slooten

Winter and Christmastime seem to call out for a hot cider drink, preferably spiked, for sipping by a fire or with a good movie, like National Lampoon’s Christmas Vacation. This recipe hits all the high notes in my opinion, with cider, maple syrup, orange flavour, spices. And whiskey. What’s not to love? The orange really sets this hot cider drink apart with just the right amount of citrusy accent to give it a twist. If you are short on vanilla beans, in a pinch, you could substitute with Nielsen Massey vanilla extract, but the bean really adds a nice touch. The sweetness of the cider doesn’t really require much of the maple syrup, but by all means, include some. It does round out the taste nicely. As mentioned below, I used Canadian Club whiskey, but whatever your favourite is, certainly use it if you wish. 

If you’re not familiar with Nielsen-Massey extracts and flavourings, you’re in for a treat. I have been using their vanilla for years in baking among other things, but they also make a fine line of other extracts as well. Almond and lemon are more of my favourites. Almond and cherry pie are almost indispensible in my book. They are also one of the few companies that still manufacture rose water, which I’ve used in cookies and puddings, just to name a few possibilities. So, if you are baking this Christmas, it pays to use the very best in vanilla extracts especially, as the fake stuff (artificial vanilla) just doesn’t compare. I cannot be stress this enough. Now, on to some pure sipping yumminess!

Ingredients:

2 quarts apple cider
1/2 cup 100% pure pomegranate juice
1/3 cup 100% pure maple syrup (adjust maple syrup if cider is already sweet)
1 Nielsen-Massey Madagascar Bourbon Vanilla Bean
1 teaspoon Nielsen-Massey Pure Orange Extract
3 large cinnamon sticks
12 whole cloves
5 whole allspice berries
1/4 teaspoon cardamom seeds
2/3 cup whiskey (I used Canadian Club)
1 large Gala apple, thinly sliced (garnish)

Add apple cider, pomegranate juice and maple syrup to a large saucepan; heat over medium-high heat. Split vanilla bean in half lengthwise with the tip of a small knife. Scrape both sides of the bean with the knife’s dull side and add the seeds and bean to the saucepan.

Add the orange extract, cinnamon sticks, cloves, allspice berries and cardamom seeds to the saucepan; stir to combine. Bring to a boil. Reduce heat to medium-low and simmer for about 30 minutes.

Strain mulled cider through a fine mesh sieve. Add whiskey; stir to combine. Serve with a fresh apple slice. (I might be inclined to use a cinnamon stick too.) 

Serves 6

References:

Nielsen-Massey Vanillas Inc. http://www.nielsenmassey.com/culinary/about-nielsen-massey-vanillas.php Last accessed November 25, 2016. They have a whole section of recipes on this website, it’s fabulous. 


You can follow the further adventures of Sue or sign up for a class at her website: wwwsvanslooten@icloud.com or email at suevanslooten@icloud.com.


Oatmeal Raisin Nut Cookies

 Oatmeal Raisin Nut Cookies

By Sue Van Slooten

This is a delicious, slightly chewy, slightly sweet, but oooh sooo yummy oatmeal cookie! The world NEEDS this cookie!

Many of you know that I love oatmeal bread, but what you may not know is I love oatmeal cookies even more. I have tweaked, added, experimented, and generally tuned my recipe, until I’m fairly confident it’s the best Oatmeal Raisin Nut Cookie recipe there is. At a recent picnic, my suspicions were confirmed; comments were in the rave category. All 2 dozen disappeared; there weren’t even any crumbs. These cookies make a large, 3-inch “fat” cookie, nothing chintzy here, but a good healthy dose of cookie heaven. For the picnic, I made a double batch, feel free to do so, but there would have been mutiny if I didn’t make some for the family. Those cookies are long gone, but there have been several hints for “more.” They are also good keepers, if they last that long, and freeze well too, at least, I’m assuming they would, as none have never made it that far. For those of you who are nut allergic, just leave the walnuts out. You will still have a really fantastic cookie.
 

Oatmeal Raisin Nut Cookies.  Photo by Sue Van Slooten

Oatmeal Raisin Nut Cookies.  Photo by Sue Van Slooten


Oatmeal Raisin Nut Oatmeal Cookies

Ingredients:

¼ cup demerara sugar (if you can’t find it, just use dark brown)

½ cup dark brown sugar

½ cup butter, softened

¼ cup shortening

½ tsp. baking soda

1 tsp. ground cinnamon

½ tsp. baking powder

¼ tsp. salt

1 egg

1 ½ cups quick cooking oats

½ cup white flour

½ cup whole-wheat flour

1 cup raisins

1 cup chopped walnuts

Granulated sugar

Water glass

Method: Heat oven to 375 F. Mix all ingredients except oats, flour, raisins, and nuts. Stir in flour, oats, raisins, and nuts. Drop or pat dough into a “patty” at least 2 good-sized tablespoon at a time, about 2 inches apart on an ungreased cookie sheet. I tend to be generous, and if you want the three-inch monster cookie, you might want to use more. Flatten the dough or patties to a little less that ½” thick with a water glass, the bottom dipped in granulated sugar. This gives the cookies a uniform thickness and some sparkle. Bake until light brown, about 10 minutes. As ovens vary, this may be more or less, just use your own judgment. Remove quickly from cookie sheet and let cool on wire racks. The recipe makes about 2 dozen 2-3 inch cookies.

Important Notes: You can use other kinds of oats as well, the last time (the ones in the photo) I did a 50/50 mix of large flake and rolled. The water glass will start picking up the sugar after it’s been used once or twice on the dough.

You can follow my further adventures at myMother Earth Website, motherearthnews.com.  Or, you can email me at suevanslooten@icloud.com.


A Cool Sipping Summer Cocktail

A Cool Sipping Summer Cocktail

Sue Van Slooten


Bee's Knees Photo by Domaine Pinnacle.

Bee's Knees Photo by Domaine Pinnacle.

First off, this recipe is absolutely delicious!  It’s a rather unlikely combination in a way, as drinks using honey are somewhat unusual. One that comes to mind is mead, a very ancient drink made from honey, spices and water, among other ingredients, then fermented. Mead is fairly difficult to come by for the most part, although it may be more popular in England. This cocktail makes use of honey simple syrup, and simple to make it is. It’s just a 50/50 concentration of honey and water, simmered together. (Regular simple syrup is just water and white sugar, same ratio.  Try it for sweetening ice tea.) The recipe calls for Ungava gin, and if you can’t find it, use any high quality gin that’s readily available, although Ungava would be preferred for its unique flavor. This gin is a Canadian specialty utilizing arctic plants and herbs from northern Quebec. It has a lovely golden colour to it, unlike the usual clear gins on the market. Wait a minute you say, Canadian gin? There is no such thing. Gin comes from England, end of story. Not quite. This one is the first to be made in Canada, outside of the English sphere of gin influence. So if you can find it, do try it, you will be very pleasantly surprised. 

Bee's Knees                  

Ingredients:

Ungava Gin - 45ml

Lemon juice - 30ml

Honey syrup - 30ml

Total Recipe yields one portion

Method:

-Load ingredients into shaker tin

-Shake with one scoop of ice

-Strain over chilled glass

Honey syrup recipe:

Add one part honey with one part water and bring it to a boil.

Now you have the perfect sipper for out on the deck, balcony, picnic or whatever social occasion that needs a cool, sweet/sour drink to savor. Just the thing for this hot summer we’re having!

Please remember to drink sensibly, and don't drink and drive!

Important Notes:

Ungava Gin. www.ungava-gin.com Their website for more ideas and recipes. Do check this out, it’s a totally cool, pun intended, website. Last accessed July 14, 2016.

Ungava Gin is produced by Domaine Pinnacle.

Photo by Courtesy of Domaine Pinnacle.


Buckwheat Corn Muffins with Blueberries

by Sue Van Slooten

Milling your own flour is a delicious way to add nutrition and flavor to your recipes. Want maximum taste? Mill your own.

Cover Photo Copyrighted by iStockphoto.com/MonaMakela. Courtesy of Robert Rose Inc.

Cover Photo Copyrighted by iStockphoto.com/MonaMakela. Courtesy of Robert Rose Inc.

Many of you already know I recently invested in a grain mill, the hand crank variety. Now I have a cookbook to go along with it. If you buy only one book on the subject, this is it: “The Essential Home-Ground Flour Book,” by Sue Becker [1]. Sue is incredible; as she covers just about any aspect you can think of on milling, flours, grains, with one hundred delicious recipes to boot. Everything is very well researched, and extremely well written. The amount of information is incredible, but I found it a fabulous read. Yes, I read cookbooks, and I really like this one.  Maybe you have noticed that by now. 

Buckwheat Corn MuffinsPhoto by Sue Van Slooten

Buckwheat Corn MuffinsPhoto by Sue Van Slooten

It was a tough choice deciding which one to do first, but I settled on the Buckwheat Corn Muffins, the Fruit variation; I used blueberries. (It wasn’t easy hanging on to the berries until baking time—the blueberry vultures were about.) I am also doing Dark Molasses Oatmeal Bread, and you will hear about that in the next blog. Most of you know Oatmeal is one of my favourites, but this one is with a twist. Stay tuned. Right now let’s make some of these absolutely delicious muffins, you won’t regret having these for breakfast!

Buckwheat Corn Muffins

Ingredients:

1 cup freshly milled buckwheat flour

½ cup freshly milled corn flour

2 ½ tsp. baking powder

½ tsp. salt

¼ cup oil

2 tbsp. liquid honey

1 ripe banana, mashed

2 eggs

1 ¼ milk or nondairy alternative*

And for the variation: ½ cup light evaporated cane sugar, and ½ cup blueberries.**

You will need a greased 12-cup muffin tin, a 24-cup mini muffin pan. I used unbleached paper liners by If You Care [2].

Preheat your oven to 375 F.

1.     In a large bowl, whisk together buckwheat flour, corn flour, baking powder and salt. Make a well in the center. Set aside.

2.      In another bowl, whisk together oil, honey, banana, and eggs. Add all at once to flour mixture. Mix just until incorporated.

3.     Divide batter evenly among prepared muffin cups, filling three-quarters full. Bake in a preheated oven for fifteen minutes (12 minutes for mini-muffins), until golden brown and tops spring back when lightly touched.

*Sue suggests almond, rice, soy or coconut in this recipe.

** Variation:

Buckwheat Corn Fruit Muffins: In Step 1, add ½ cup light evaporated cane sugar (I confess, I didn’t add the extra sugar, apologies Sue!). After mixing batter in Step 2, gently fold in ½ cup blueberries, diced peaches or sliced strawberries. 


Important Notes:

1.     Becker, Sue. “The Essential Home-Ground Flour Book.” Toronto, ON: Robert Rose Inc., 2016.

2.     Try Unbleached, Totally Chlorine-Free (TCF) baking cups by If You Care. They’re as good or better than parchment, no greasing required.  www.ifyoucare.com Imported from Sweden. 


You can follow my further adventures and check out my Real Food blog on MOTHER EARTH NEWS at wwwMotherEarthNews.com. If you wish, you can email me at suevanslooten@icloud.com. I’d be thrilled to hear from you!


Out There: A Story of Ultra Recovery

Out There:  A Story of Ultra Recovery,

By David Clark

A Book Review


David Clark eloquently writes about his experiences as an addict, a recovering addict, and ultimately, an ultra marathoner.  It’s a chronicle of triumph over terrible adversity, and a true inspiration to anyone who wants to see light conquer darkness in an extreme situation.  It’s about overcoming alcoholism, losing a lot of weight (he once was at 320 lbs.), eating a good diet, and how to run a good race.  In this case, the race is 100 miles, or over three times the length of the Boston Marathon.   He details in great style his training, and how he started out with a “Turkey Trot” of 5 km, but ends up doing an Iron Man triathlon, all the while on his path to the 100 miles.  It’s truly an incredible accomplishment, the “what and how” of pushing the human body to new limits, when one is incredibly motivated. 

Now, I’m not that motivated, but, he has inspired me to take up my weight training again, after being told by the so-called medical community that I really shouldn’t do that.  Only aerobic activity counts in their world, or so I was told.  Well, you know what they can do with that.  Sometimes you come to the conclusion that what they really want are 97 pound, anorexic weaklings.  Besides, when was the last time any of them pumped serious iron?  And you know what?  I do feel much better: Able to do more, and I have more energy. 

David breaks his book into more or less three sections:  The first details his addiction to alcohol, and how he finally came to the realization that if he didn’t get well, he was going to die.  This isn’t light reading, as he really details what life for an alcoholic is like.  This is an important concept, because most of us non-alcoholics have no clue what this is.  The middle part, a smaller section, is on diet and how not to eat junk food.  Eating your meals at McD’s every day really isn’t a healthy option.  The last section deals with running, and lots of it.  He even details his “fashion choices” along the way, like, what do you wear that doesn’t make you look like you weigh 320 lbs, and you’re in the gym for the first time?  That could be a really tough one.  He gives advice or what I would call experience, on what it’s like to keep it all together mentally and physically as you’re running 100 miles.  Not many of us would even attempt such a thing, but it does give whole new meaning to a marathon:  An Ultra Marathon. 


Bibliography:

Clark, David. “Out There:  A Story of Ultra Recovery.”  2014.


New Meaning for the Daily Grind

No, this isn’t about ground beef. This is about flour. Last year I became intrigued by grain mills, what a great idea, so thought I. That lasted until sticker shock set in. The whole idea was put on hold as “nice idea, too expensive.” You can literally spend hundreds upon hundreds of dollars for a grain mill, some are quite attractive to look at, but still, they’re expensive pieces of kitchen equipment. Trolling through Amazon taught me there are a great variety out there, some do a better job apparently than others, but at the end of the day, unless you buy one and try it, you don’t really know how it will work or whether it will fit your needs. Our needs were basic, just something to grind whole-wheat flour or whatever strikes my fancy. I don’t see myself as a daily grinder, but many do. Who knows, with enough passion, it could happen!

Victorio Grain Mill, side view.  Photo by Sue Van Slooten

Victorio Grain Mill, side view.  Photo by Sue Van Slooten


In a recent trolling trip through Amazon, I came across a Victorio grain mill, and I checked it out, as I already own their food mill, and love it. It was under $100, so with a click of the mouse, said mill, along with some bags of Bob’s Red Mill whole grains, were on their way. Upon its arrival, it got put to immediate use. Alas, my butcher block table was too thick for the clamp, but the workbench in the garage was perfect. You won’t want to connect this to anything fancy, like your dining room table.  Serious force will be applied. I had ordered a bag of hard red spring wheat berries to make whole-wheat flour, so in went two cups, and I started turning the crank. You will get a very nice upper body workout, which I consider a side benefit. With a bowl underneath to catch the flour as it came out, soon enough, we had flour. It took about ten minutes to create three cups flour, and that is the normal yield according to a book I got on grinding (more about that in the next blog!).


The next step was to bake something, in this case I chose banana bread. If you have never tasted a baked item made with freshly ground flour, you are in for a real treat. The taste is totally different-fresher, tastier, more what you would expect a baked good should taste like. You just do not get that experience with commercially ground flours and baked products, especially whole-wheat. Many of the commercial ones taste strong, dry and bitter in comparison. For those reasons alone, whole-wheat flour was never popular in our house.

Victorio Grain MillPhoto by Sue Van Slooten

Victorio Grain MillPhoto by Sue Van Slooten


So what are some of things you need to look at when purchasing a grain mill? Certainly cost is a factor, but obviously not the only one. To motorize or not to motorize? Mine is not, but often times you can order a motor to go on it afterward if you wish. Check the model you’re interested in to make sure it can be upgraded. The other thing to consider about motors is if it’s manual, it will always work.  If you’re off the grid, it’s obvious, but if you have thirty-hour power outages like we do here, you might want to keep that in mind too. It never hurts to be prepared. You can still make stuff on your camp stove in that situation!

Another thing to consider is speed. Some grind faster than others. Mine is considered a “slow” one, but I thought three cups in ten minutes pretty adequate. Now if you are baking for a family of six, you might feel differently. Or....get the kids to do it! Mills also grind in different ways: Burr grinders, steel, stone. 

What you can grind is also important. Mine for example won’t do large grains like corn, so if cornmeal is what you want, you will have to buy something bigger. Be aware that you are limited by what can fit through the hopper. Small grains like wheat berries are what mine is designed for. It can handle buckwheat, teff, rice and the like. Oats are not recommended because they are too light to flow through the hopper. You need to watch that the grinding cones don’t overheat if there isn’t enough material being processed through them, hence the problem with oats. Perhaps a bigger mill would handle oats with no problem. Or, you could run oatmeal flakes through a food processor or blender if you want oat flour.

As you can see, there are a lot of factors that go into the decision to get a grain mill: What you intend to bake/make, size of your family, how often you intend to use it, lots of considerations. I can guarantee one thing though: If you purchase one and try the flour in your baked goodies, you will be won over by the taste

Important Notes:

Bob’s Red Mill. www.bobsredmill.com Bob’s carries a dizzying array of whole grains. They often have your harder to find items and more unusual flours, etc. Last accessed May 11, 2016.

Victorio. www.Victorio.info You can check out all their products here. They have sprouters, canners, dehydrators, etc. Last accessed May 11, 2016

If you wish, you can email me at suevanslooten@icloud.com. I’d be thrilled to hear from you!


Delicious Gourmet Style Chocolate Bark

This tasty version of chocolate bark is elevated to gourmet status by the addition of cocoa nibs, those tasty little crunchy bits of chocolate-y flavor. This yummy treat was inspired by a Facebook post by Castronovo Chocolate, a premier American chocolatier from Florida. (See website link below.) Fortunately for those of us living on planet Earth, they ship, as I recently have discovered. Winter is a good time to order. I’m quite sure their version is superior so, for my recipe, while you are awaiting delivery, purchase the best chocolate you can find.


Gourmet Style Chocolate BarkPhoto by Sue Van Slooten

Gourmet Style Chocolate BarkPhoto by Sue Van Slooten

Ingredients:

1 lb dark chocolate, chopped, best that you can find

1 cup dried tart cherries, cut in half

½ cup unsweetened coconut

2 tbl. or to taste, cocoa nibs to sprinkle on top

More coconut to sprinkle on top


Lightly grease a cookie sheet. Melt the chopped chocolate over gentle heat until completely melted, stirring frequently. Stir in the cherries and1/2 cup coconut. Mix well. Turn out onto the cookie sheet and spread until about ¼” thick. Sprinkle the top with more coconut and cocoa nibs, pressing lightly into the chocolate. Let cool completely (or chill), break up into pieces. Feel free to hoard it all to yourself. Sharing recommended but not necessary. Makes about 2 lbs. candy. 


Important Notes:

http://www.castronovochocolate.com Beautiful website. Last accessed February 17, 2016.


You can follow my further adventures at www.svanslooten.com, and you can email me at suevanslooten@ripnet.com.  I teach cooking and baking classes at my home on beautiful Big Rideau Lake, Rideau Lakes Township, ON. I specialize in small classes for maximum benefit. Give me a call, sign up for a class, and I’d love to see you. 


Pan Lebkuchen

Pan Lebkuchen

Lebkuchen has been around in one form or another for centuries in Germany, crispy, cake form, chewy, almost like the brownie debate. This is a slightly chewy bar cookie affair. Indeed, one could argue that this is the German answer to brownies, before chocolate came on the scene centuries later. The common factor in all lebkuchen is honey and spices, very expensive commodities way back then. It is in many ways the ancestor of today’s gingerbread. Some authentic recipes take two days to make, and it is excellent, but this version is a rapid form you can make (and eat) in one day. Notice this recipe calls for molasses and brown sugar, which would not have been an authentic ingredient six hundred years ago. They pretty much would have relied on honey and perhaps beet sugar-see note.


Pan LebkuchenPhoto by Sue Van Slooten

Pan LebkuchenPhoto by Sue Van Slooten

I made mine yesterday, about one third of the batch is left, as the “other half” found out about them. They happen to be his favourite. The recipe calls for a glaze, but I am going to dispense with that, as I like to let the gingerbread taste shine on its own. Feel free to decorate any way you wish, see the photos for one way of doing it. The recipe itself came from Better Homes and Gardens “Cookies for Christmas,” now an older book, but it is also probably online by now. Better Homes used to print thin hard-bound books that contained recipes that were not complicated, hence this simpler version here. So, if you want to take a quick trip to Germany, here we go.

Pan Lebkuchen:

2 c. all purpose flour

1 tbl. pumpkin pie spice (or your own mixture)

½ tsp. baking soda

1 egg

2 tbl. cooking oil

½ c. brown sugar

1/3 c. honey

1/3 c. dark molasses

½ c. chopped almonds

½ c. mixed candied peels and fruits, finely chopped

Additional fruits, nuts and rinds for decorating


Stir together flour, pumpkin pie spice, and baking soda. In a large mixer bowl, beat together egg and oil. Add brown sugar and beat till fluffy. Stir in honey and molasses. Add flour mixture and beat all till well mixed. Stir in chopped almonds and candied fruits and nuts.

Spread in a greased 15X10X1 inch baking pan. (I keep a can of spray oil handy, constantly greasing whatever you feel comfortable using to push the dough around. This part is a bit tedious, but if you keep at it, it will eventually behave and spread to all parts of the pan.) Bake in a 350 oven (325 for convection) for 15-20 minutes or till done. Immediately score into bars with a sharp knife. Garnish each with additional candied fruit.  (I like the look of the red cherries.) Cool thoroughly. Cut into bars. Makes 32.


Notes:

1.     If anyone knows where one can find beet sugar, let me know. It is used more extensively in Europe, particularly in Germany, than N. America. Apparently it is around if you know where to look.

2.     Better Homes and Gardens. “Cookies for Christmas.” Des Moines, Iowa: Meredith Corporation, 1985.

You can follow my further adventures at www.svanslooten.com, and you can email me at suevanslooten@ripnet.com

I teach cooking and baking classes at my home on beautiful Big Rideau Lake, Rideau Lakes Township, ON. I specialize in small classes for maximum benefit. Give me a call, sign up for a class, and I’d love to see you. 


Shortbread Hearts with Cranberries

Shortbread Hearts with Cranberries

Shortbread Hearts with Cranberries.  Photo by Sue Van Slooten

Shortbread Hearts with Cranberries.  Photo by Sue Van Slooten


This is the perfect shortbread/Christmas cookie! If you love shortbread, and a lot of people do, this is THE cookie to make. The colourful cranberries make them really pop at Christmas time. This delightful recipe comes from “Christmas Cookies: Dozens of Yuletide Treats for the Whole Family,” by Monika Römer [1, 2]. The recipes in this book are sometimes more challenging, but they are spectacular, the photos by Oliver Brachat, (a chef and pâtissier himself) are gorgeous, and there is a special kids section for baking with the younger set that is quite good. Oh for some kids to bake with! Also, if any of you are into German traditions of baking, or you want to see what it is all about, I would suggest this book. Note that heart shapes are very popular in Germany at Christmas, but they also would work beautifully for Valentine’s Day. Check out my photo, and I think you will agree.


Ingredients:

1 1/3 cup (300 g)salted butter

1 (200 g) cup sugar

4 cups (500 g) all purpose flour

5 o.z (140 g) dried cranberries (not too finely chopped)


Additional: Flour for dusting, heart-shaped cookie cutter, parchment. I would also use stars.


Preheat your oven to 350 F (180 C), unless your have a convection oven, in which case, preheat to 320 F (160 C). In a mixing bowl, beat the butter with a hand mixer with a whisk attachment for about 10 minutes (I would recommend a stand mixer). Afterward the mixture should be cream white and should have visibly increased in volume. Sprinkle the sugar in and continue stirring until the crystals have dissolved. (At this point I would switch to the paddle attachment.) Add in the flour and cranberries, and then knead into a smooth dough. (Watch adding in the flour at the end, as you may not need it all. If you mixture is too dry, add more butter.)


Roll dough out on a floured countertop (or board) to form a sheet approximately 1/3” (to be specific, 2/5”) or 1 cm. thick. Using cookie cutters, cut out small hearts (or stars), and place onto a baking sheet lined with parchment paper.


Place the baking sheet in a preheated oven (middle rack) and bake the shortbread hearts for about 10 minutes, until they are very lightly coloured. Remove the cookies from the oven, take them off the baking sheet along with the parchment paper and allow to cool. Makes one tray.


Now all you need is a proper cup of tea, and you have a most comforting afternoon Christmas treat!


Notes:

1.     Römer, Monika. “Christmas Cookies: Dozens of Classic Yuletide Treats for the Whole Family.” Skyhorse Publishing, Inc., 2015.

2.     Römer, Monika. “Unsere Weihnachtsbäckerei.” Hölker Verlag im Coppenrath Verlag GmbH & Co. KG, Münster, Germany, 2012.


Note 2 is the original German version of this book.


You can follow my further adventures in the world of food or sign up for a cooking/baking class by visiting my website at www.svanslooten.com and you can also email me suevanslooten@ripnet.com. I’d love to hear from you!


Chocolate Chip Sourdough Pancakes with Butter Leaves and Dried Cranberries

Chocolate Chip Sourdough Pancakes with Butter Leaves and Dried Cranberries


Photo by Sue Van Slooten

Photo by Sue Van Slooten

A lot of folks love sourdough, and are always looking for new ways to incorporate it into their recipes. In my never-ending search for the better pancake, I came up with this novel recipe. It’s fairly healthy for you, (if you ignore the chocolate chips), as you use buckwheat flour. My son loves chocolate chip pancakes (of course, I like them too!), so I thought, can I use the chocolate with the sourdough? I’m happy to report that yes, you can. Then to just gild the pancake lily a little more, dried cranberries got sprinkled on top, for color and more flavor. Of course, maple syrup (or anything else you like), goes on top. As an added touch, especially as we near the holidays, I came across a novel way to use butter decoratively: Butter leaves. They are very easy to make once you get the hang of them and look impressive. Check it out in my photo, but you can use any small cutter. One word of caution, as I used a fairly plain leaf, after the maple leaf I was after tended to crumble. Sharp edges don’t do well. Hearts would work well, or a snowman. Let’s start with the pancakes:


Chocolate Chip Sourdough Pancakes

I cup buckwheat flour

1 tsp. baking soda

1 tsp. salt

½ tsp. baking powder

¼ cup sugar

2 tbl. vegetable oil

1 egg

1 cup sourdough starter, fed or unfed

¾ cup mini chocolate chips, or ½ cup of the larger chips

½ cup dried cranberries


In a large bowl or measuring cup (at least 4 cups), place your dry ingredients. Add your oil, egg, sourdough starter and mini-chips, mixing well. If you’re using the larger, regular chocolate chips, just sprinkle a few on each pancake as you cook them. Have a hot griddle or large frying pan oiled, even if it’s non-stick. Pour dollops of batter, which should be “pancake consistency” onto the pan. If your batter is too thick, you can always thin with some milk. When bubbles form, and the bottom is browned, flip. If using the large chips, don’t let cook too long after flipping, so they don’t burn. Place onto plates or a large platter when cooked. Sprinkle with dried cranberries and add syrup. Eat while warm.


Photo by Sue Van Slooten

Photo by Sue Van Slooten

For the Butter Leaves:

¼ to 1/3 inch slices of butter, salted or unsalted, slightly chilled

1” cookie cutters or canapé cutters


Use the cutters just as if you were making cookies, only instead of dough, it’s butter. You don’t want the butter too cold, or it tends to crumble.  You don’t want it softened either, or they will not turn out. I would suggest taking refrigerated butter out and letting it warm up for 10-15 minutes. After pushing the cutter into the butter, use the end of a fork or tip of a spoon to push the butter out gently.  Even a finger works well. I made mine a little thicker, about 1/3”, use that if they break too much.  Any scraps can be re-used for other purposes. Keep chilled.


You can follow my further adventures, or sign up for a cooking class, at www.svanslooten.com.  You also can always email a question at suevanslooten@ripnet.com. We’d love to hear from you!    


Slow Food Gold & Treasure Coast Future Chef Competition

Slow Food Gold & Treasure Coast just hosted their 2nd Annual Future Chef Competition during Food Day 2015.  Four chefs, Chef John Carlino, Chef Chris Pawlowski, Chef Rasheed, and Chef Leslie Moyer oversaw the event, with young people from several area schools.  The students represented Northport K-8 and St. Lucie West K-8, among other schools.  It is noteworthy that the K-8 students went head to head with the high schoolers from the Culinary Arts elective.   The winners were Treasure Coast HS, all 1st year students.


I would like to take this opportunity to point out that this is a continuing effort on the part of Slow Food Gold & Treasure Coast, the schools, the chefs, and their sponsors and students, with the Competition quickly becoming a tradition.  You cannot state enough how important it is for our children to take an interest in their food, how to prepare it, where it comes from, and whether or not it is healthy for them.  The very fact that schools, Slow Food, the Chefs and all the sponsors are willing to step up to the plate and offer instruction, funding and competitions like this one shows how seriously the subject of food is taken.  And it shows how seriously the youth themselves take cooking and food more than anything else. 


Here are some well-deserved congratulations to the winning team and all participants, and we hope to see everyone back next year for the 3rd Annual Future Chef Competition of 2016.


Special thanks to the Sponsors:

Downtown Ft. Pierce Farmer’s Market

Coldwell Bankers Paradise, Mike and Amy Dahan

South Florida Heritage Farm


Helpful notes and links:

http://www.slowfoodgtc.org


All photographs courtesy of Ronnie (Veronica) Paul and Valerie Smith when available.


Harvest Vegetable Soup with Naughty Garlic Bread

                                    Harvest Vegetable Soup with Naughty Garlic Bread


It’s time to celebrate the autumn harvest in all its glory, so I developed these recipes for a recent meal at The Table, the community kitchen where I am a volunteer chef. This is autumn cooking at its finest, full of nutritious, healthy vegetables, with a naughty garlic bread loaded with garlic. If garlic isn’t your thing, don’t go any further, just go directly to the soup recipe, where you will be rewarded with a hearty lunch or dinner meal. The beauty of this soup is it makes use of what ever vegetables you have on hand, is completely vegetarian (unless you want to add chicken or beef), and cooks up pretty quickly. This is a crowd-sized recipe, and I have already cut the recipe in half for you. If you’re feeding 2 armies, by all means double it. Ditto for the garlic bread, I made four loaves originally, but I will leave it up to your discretion (and how much garlic bread you like). Feel free to use other veggies than the ones I did. The garlic bread makes use of loads of butter, garlic, with some parsley for color, and can heat in the oven while the soup is finishing up. 


Harvest Vegetable Soup

8 lbs fresh tomatoes, chopped

4 Peppers, preferably in several colors, cut in chunks

2 large chopped onions

4 cups chopped flat Italian beans, in 1” chunks

4 cups cubed butternut squash

6 large carrots, sliced into ¼” diagonals

3-4 finely minced jalapenos, or to taste

2 cans red kidney beans

1 can black beans

2 cans bean mélange or mix

¼ c. chopped fresh basil

1 tbl. chopped fresh thyme

1 tbl. chopped fresh rosemary

1 tbl. salt


In a large stockpot, put the tomatoes, peppers, onions, squash, carrots, jalapenos, beans, herbs and salt in. Cover with water, and bring to a boil. Simmer until tomatoes are very soft (and release their juice) and squash is tender. This doesn’t take all that long, about 20 minutes. Test frequently so things don’t get overcooked. Taste for the salt, and see if you want more. 


Harvest VegetablesPhoto by Sue Van Slooten 

Harvest VegetablesPhoto by Sue Van Slooten


Naughty Garlic Bread

2 good quality baguettes or Italian loaves, split

1 lb butter

¼ to ½ cup garlic puree, or 4-6 tbl finely minced garlic

¼ cup finely chopped fresh Italian parsley leaves


Melt butter in saucepan, and add pureed garlic or minced garlic. Let heat on very low heat for about 10 to 15 minutes, to infuse the garlic flavor into the butter (I did this just on a pilot light of the gas stove.). Add parsley, stir. On sheets of foil, place the loaves of bread, and ladle garlic butter onto the cut sides. Fold back together, seal inside foil, and place in a slow oven, about 300, for 15 minutes. Slice and serve. That’s it. 


Naughty Garlic Bread. Photo by Sue Van Slooten 

Naughty Garlic Bread. Photo by Sue Van Slooten


Notes:

The Table Community Food Centre. www.thetablecfc.org. Last accessed October 7, 2015.

Photos taken by Sue Van Slooten


Artisan Bread with Pancetta and Rosemary

This bread came about as a real “What do I do with....?” scenario. It all started with leftover pizza dough. I was trying to think, what could you do with it that was different but of course tasty, without going down the pizza/calzone route. This bread was the result. The first thought was a focaccia like creation, with chopped pancetta sprinkled on top. Then I flipped through the Artisan Bread in 5 Minutes a Day cookbook [1], and saw where they kneaded the pancetta into the dough. Aha! We’re on to something now! What I will give you below is the dough recipe, which I got from The Table, [2] the community kitchen where I work one day a week, with the pancetta and a liberal sprinkling of rosemary, kneaded in. Pancetta can usually be found in the deli section of your supermarket. The pancetta melts as it bakes, oozing into the bread like butter with porky goodness.

This recipe is fabulous, especially when you want pizza NOW.

The Table’s Quickee Pizza Dough:

1 (.25 oz.) package active dry yeast

1 tsp. white sugar

1 c. warm water (110 degrees)

2 ½ cups bread flour

2 tbl. olive oil

1 tsp. salt


  1. Preheat oven to 450 degrees F (230 degrees C). In a medium bowl, dissolve yeast and sugar in warm water. Let stand until creamy, about 10 minutes.
  2. Stir in flour, salt and oil. Beat until smooth. Let rest for 5 minutes.

3.     Turn dough out onto a lightly floured surface and pat or roll into a round.       Transfer crust to a lightly greased pizza pan or baker's peel dusted with cornmeal. Spread with desired toppings and bake in preheated oven for 15 to 20 minutes, or until golden brown.


This is if you want to make pizza with this lovely dough. I took things in a different direction after making the dough. 


Artisan Bread with Pancetta and Rosemary.  Photo by S. Van Slooten

Artisan Bread with Pancetta and Rosemary.  Photo by S. Van Slooten

Artisan Bread with Pancetta and Rosemary:

6 slices pancetta, no substitute

1 tsp. dried rosemary


Dice the pancetta into ¼” dice, and then knead it and the rosemary into the dough on a floured board. Once it is evenly distributed, shape the dough into a boule or round, about 2” thick in the middle, and about a 6-8” round. Let rise covered with a dishtowel, for about an hour. Heat your oven to 450 as mentioned above. Gently place lace boule on greased cookie sheet, and slash with an X across the top. Dust lightly with flour if desired. You can also sprinkle more of the dried rosemary on top if you wish. 


Bake 25 to 30 minutes (depending on your oven), or until well browned. Remove, cool 10 minutes, and loosen from the sheet. Place on a rack to cool completely. 


Notes:

1.     Hertzberg, Jeff and Francois, Zoe. Artisan Bread in 5 minutes a Day. New York: St. Martin’s Press, 2007.

2.     The Table Community Food Centre. www.thetablecfc.org. Last accessed  July 28, 2015.